
This is the second part of RoI Series. It doesn’t include an introduction about what RoI is, so if you didn’t read the First Part it might be hard to follow this one.
Why do we want to modify RoI Pooling?
As you remember from the first part of the series, RoI Pooling has one major problem. It loses a lot of data in the process.

Every time it does that, part of the information about the object is missing. That lowers the precision of the whole model and a lot of really smart people thought about it.
Setup
Before we start I need to quickly explain our model.


We’re going to use Mask R-CNN network for testing. The only reason we’re using it is that this kind of network benefits more from a precise pooling layer, so it’s easier to show a difference between RoI Align and RoI Pooling. It doesn’t really matter which network we’re using until it does RoI Pooling. Because of that our setup remains the same and looks like that:

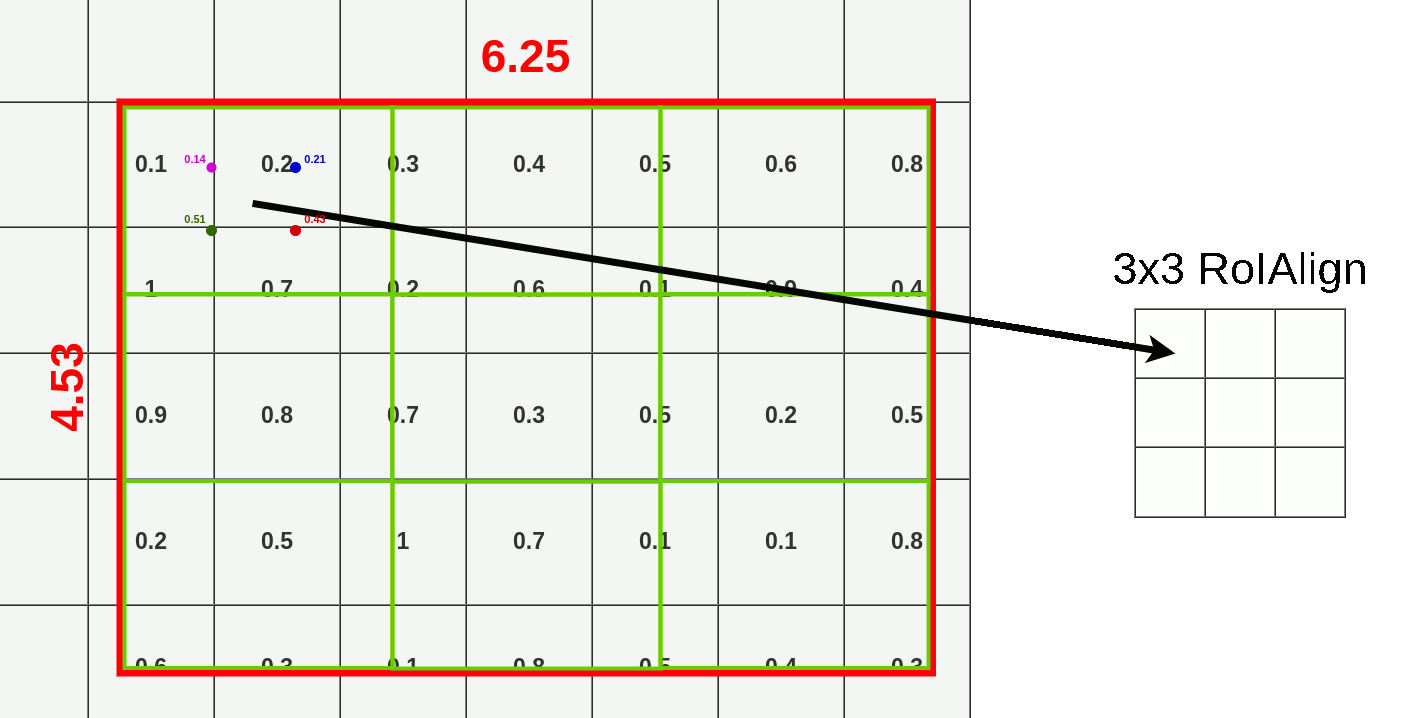
Our model takes an image input of size 512x512x3 (width x height x RGB) and VGG16 is mapping it into a 16x16x512 feature map. A scale factor is 32.
Next, we’re using one of the proposed RoIs (145x200 box) and try to map it onto the feature map. Because not all of our object dimensions can be divided by 32, we’re placing RoI not align with our grid.

- (9.25,6) - top left corner
- 6.25 - width
- 4.53 - height
Once again we’re choosing our pooling layer to have a size of 3x3 so the end result shape is 3x3x512 (That’s just an arbitrary example to make it easier to display on image. Your pooling layer will probably have a different size).

Up till this point, everything looks exactly the same as in Part One.
Introducing RoI Align
The main difference between RoI Pooling and RoI Align is quantization. RoI Align is not using quantization for data pooling. You know that Fast R-CNN is applying quantization twice. First time in the mapping process and the second time during the pooling process.

We can skip that by dividing original RoI into 9 equal size boxes and applying bilinear interpolation inside every one of them. Let’s define boxes then:

Each box size is determined by the size of the mapped RoI and the size of the pooling layer. We’re using a 3x3 pooling layer so we have to divide mapped RoI (6.25x4.53) by 3. That gives us a box with a height of 1.51 and a width of 2.08 (I’m rounding values here to make it easier). Now we can put our boxes into mapped RoI:

If you look at the first box (top left), you can notice that it covers six different grid cells. To extract value for the pooling layer we have to sample some data from it. To sample data we have to create four sampling points inside that box.

You can calculate where each of those points should be by dividing height and width of the box by 3.
In our case we’re calculating first point (top left) coordinates like this:
- X = X_box + (width/3) * 1 = 9.94
- Y = Y_box + (height/3) * 1 = 6.50
To calculate the second point (bottom left) we have to change only the Y:
- X = X_box + (width/3) * 1 = 9.94
- Y = Y_box + (height/3) * 2 = 7.01
Now when we have all the points we can apply bilinear interpolation to sample data for this box. Bilinear interpolation is usually used in image processing to sample colors and its equation looks like this:

Instead of trying to understand this equation please take a look on a graphical interpretation of how it works:

When you take the first point from our box, you’re connecting it with closest neighboring cells (exactly to the middle), unless it’s already taken. In this case, our point has coordinates (9.44, 6.50). Closest middle of the cell in top-left direction is (9.50, 6.50) (it would be (9.50, 5.50) if our point was only 0.01 higher on the grid). Then we have to select a bottom-left point and the closest one is (9.50, 7.50). Following the same rule, we’re selecting (10.50, 6.50) and (10.50, 7.50) as top-right and bottom-right points. Above the RoI, you could see the whole calculation to get the value for the first point (0.14).

This time we’re interpolating from:
- top-left: (10.50, 6.50)
- bottom-left: (10.50, 7.50)
- top-right: (11.50, 6.50)
- bottom-right: (11.50, 7.50)
You should start seeing a pattern here :). Here are the other points:

- top-left: (9.50, 6.50)
- bottom-left: (9.50, 7.50)
- top-right: (10.50, 6.50)
- bottom-right: (10.50, 7.50)

- top-left: (10.50, 6.50)
- bottom-left: (10.50, 7.50)
- top-right: (11.50, 6.50)
- bottom-right: (11.50, 7.50)
Now we have all the points calculated and can apply Max Pooling on them (it could be Avg Pooling if you want):

I’m not going to show you all interpolations because it would take to long and you probably know how to do them already. I’m going to show you how the whole process works for pooling data from this RoI using RoIAlign:
And ofc. this process goes for every layer there is so end result contains 512 layers (the same as feature map input)

Notice that even if we’re not placing our sampling points inside all cells from the feature map, we’re extracting data from them by bilinear interpolation.
In this case, cells 11x6, 11x7, 11x8, 11x9, 11x10, 13x6, 13x7, 13x8, 13x9, 13x10, 15x6, 15x7, 15x8, 15x9, 15x10 will never have any points in it. If you look on second point calculation (first box), it still uses cells 11x6 and 11x7 for bilinear interpolation even if the point is in cell 10x6.
If you compare data lost/data gain from RoIAlign and RoIPooling you should see that RoIAlign uses the whole area to pool data from:

- green means additional data used for pooling.
- blue (both shades) means data lost when pooling.
RoIWarp - meet me in the middle
There is a third method of pooling data that was introduced in Instance-aware semantic segmentation via multi-task network cascades and it’s called RoIWarp. The idea of RoIWarp is more or less the same as RoIAlign, the only difference is that RoIWarp is quantizing RoI mapping onto a feature map.

And if you look on data lost/data gain:

We’re only losing a small amount of it due to bilinear interpolation.
How RoIAlign and RoIWarp affects the precision
If we look at Mask R-CNN paper there are some important numbers to discuss. First one is a change in average precision when applying different RoI layers on ResNet-50-C4 with stride 16:
| align? | bilinear? | agg. | AP | AP50 | AP75 | |
|---|---|---|---|---|---|---|
| RoIPool | max | 26.9 | 48.8 | 26.4 | ||
| RoIWarp | ✓ | max | 27.2 | 49.2 | 27.1 | |
| ✓ | ave | 27.1 | 48.9 | 27.1 | ||
| RoIAlign | ✓ | ✓ | max | 30.2 | 51.0 | 31.8 |
| ✓ | ✓ | ave | 30.3 | 51.2 | 31.5 |
There is only a small improvement when RoIWarp is applied but applying RoIAlign gives us a significant boost in precision. That boost increases with stride:
| AP | AP 50 | AP 75 | APbb | APbb50 | APbb75 | |
|---|---|---|---|---|---|---|
| RoIPool | 23.6 | 46.5 | 21.6 | 28.2 | 52.7 | 26.9 |
| RoIAlign | 30.9 | 51.8 | 32.1 | 34.0 | 55.3 | 36.4 |
| +7.3 | +5.3 | +10.5 | +5.8 | +2.6 | +9.5 |
Where APbb is an average precision for detecting bounding boxes. The test is done on ResNet-50-C5 with stride 32.
Summary
Understanding RoI Pooling is important when we want to improve our R-CNN-like model accuracy. There is a significant difference between the standard approach proposed in the 2014 paper about Fast R-CNN and a new one proposed in the 2018 paper about Mask R-CNN. It doesn’t mean those methods apply only to specific networks, we can easily use RoIAlign in Fast R-CNN and RoIPooling in Mask R-CNN but you have to remember that RoIAlign gives us better precision on average.
I really hope that my explanation is easy to understand because I’ve seen a lot of post writing about RoI Pooling without getting into calculations. In my opinion, a more visual approach is always better, especially if you don’t want to spend a whole day reading the original paper over and over to finally understand what it does.
References:
- R. Girshick. Fast R-CNN. In ICCV, 2014 https://arxiv.org/pdf/1504.08083.pdf
- J. Dai, K. He, and J. Sun. Instance-aware semantic segmentation via multi-task network cascades. In CVPR, 2016 https://arxiv.org/pdf/1512.04412.pdf
- K. He, G. Gkioxari, P. Dollar and R. Girshick. Mask R-CNN In ICCV, 2018 https://arxiv.org/pdf/1703.06870.pdf