What are Events?
Events are objects and implement the Event interface
Those objects are dispatched by the user agent (or the application itself) and handled by the Event Listener. Events are responsible for handling user interactions or network activity. There are different types of events but you can check then on MDN if you want. We have to focus on how events are propagating through the DOM.
Event propagation
First, we have to create some simple DOM to explain event propagation
<div id="container">
  <div id="dataContainer">
    <div id="clickedData"></div>
  </div>
  <button id="dataSubmitter">Add Data</button>
</div>

To handle events we need to add some Event Listeners. To do that in VanillaJS we have to get DOM element and call addEventListener on it. DOM Element is implementing EventTarget interface and because of that, we have access to addEventListener(type, callback, options) and removeEventListener(type, callback, options) methods.
- type - the name of the event
- callback - function to be called
- options - object to change default listener behavior
const button = document.getElementById('dataSubmitter');

button.addEventListener('click', e => {
  console.log('clicked');
});
After calling addEventListener we’ve added a listener to event listener list on that element (button). This list is a list of zero or more event listeners which means you can add more listeners for the same event.
const button = document.getElementById('dataSubmitter');

button.addEventListener('click', e => {
  console.log('clicked first');
});
button.addEventListener('click', e => {
  console.log('clicked second');
});
In this case when click event is dispatched, listeners will be called in the order in which they were assigned (we’ll see clicked first and then clicked second in the console).
Everyone knows what will happen after clicking on our button (2 console logs) but to show how the event is propagating through our DOM tree we have to add more listeners

And now after user interaction event is bubbled through the DOM upwards
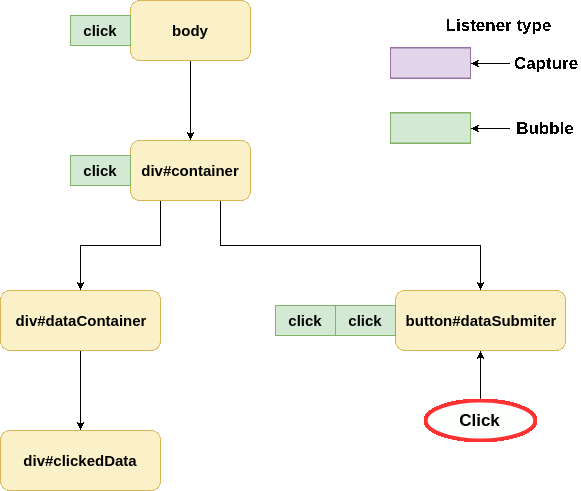
This process is called bubbling and it’s easy to understand, but it’s not the whole path. Every event starts its path from the top of the tree. This process is called capturing and to access events in the capture phase we have to create listeners with extra options passed as the third argument.
const container = document.getElementById('container');
container.addEventListener(
  'click',
  e => {
    console.log("container capture 'click'");
  },
  {
    capture: true,
  }
);
capture: true informs our listener to listen for events in phase 1 or 2. Every event has 3 phases:
- Capture (1) - going down the tree
- On Target (2) - that’s self-explanatory
- Bubble (3) - going up the tree
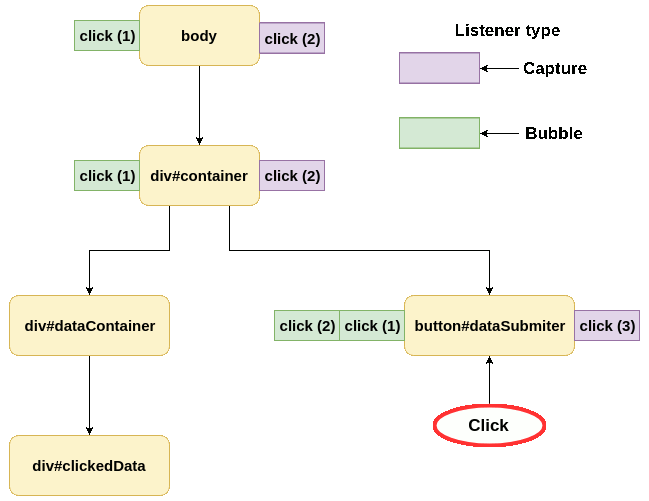
Now let’s see how our event is propagating (numbers next to event type is the order in which event listener is added).

After click event is dispatched it starts at the body level with eventPhase === 1. After that is propagates through the tree until it reaches its target (button).
At the button level phase change to 2 and we can spot unusual behavior. If you look closely on the order in which listeners are called (button), first we’re calling event listeners which are responsible for bubbling event and then listener responsible for capturing. It might seem weird at the beginning, but at the button level, our event is not in any of those phases. Because of that, our listeners are executed in order of creation. In On Target phase, listener type doesn’t matter.
After that our event is bubbling in the same way as in the previous example.
How to stop events from propagating?
Sometimes we want our events to top at the specific point of the tree. To do that we need to use e.stopPropagation() or e.stopImmediatePropagation(). Those functions are preventing other listeners from being called with the same event.
stopPropagation()
const button = document.getElementById('dataSubmitter');

button.addEventListener('click', e => {
  console.log('clicked first');
  e.stopPropagation();
});
button.addEventListener('click', e => {
  console.log('clicked second');
});
button.addEventListener(
  'click',
  e => {
    console.log("button capture 'click'");
  },
  {
    capture: true,
  }
);
Even if we call stopPropagation() inside the first listener, all listeners assigned to current elements are called. Event is not propagated into another EventTarget. We can call stopPropagation() inside any of our listeners on the way, it doesn’t have to be target or even bubbling phase. If you want to prevent the event from reaching the target you can call stopPropagation in one of the listeners listening on the capture phase.
stopImmediatePropagation()
const button = document.getElementById('dataSubmitter');

button.addEventListener('click', e => {
  console.log('clicked first');
  e.stopImmediatePropagation();
});
button.addEventListener('click', e => {
  console.log('clicked second');
});
button.addEventListener(
  'click',
  e => {
    console.log("button capture 'click'");
  },
  {
    capture: true,
  }
);
You’ve probably already spotted the difference. stopImmediatePropagation is stopping propagation on the same listener in which it’s called. If we call it inside click (2) then propagation stops at click (2) and doesn’t execute click (3). You should be aware of that difference when dealing with multiple listeners on your elements.
preventDefault()
It’s a good time to mention preventDefault method. It’s quite common in modern frameworks to do something like that:
e.preventDefault();
e.stopPropagation();
A lot of people are doing that without even knowing why. You know that stopPropagation() is stopping an event from going through the event listeners. preventDefault on the other hand, is telling the browser not to execute its default behavior.
If we call preventDefault() on click event from checkbox then browser won’t change our checkbox to the selected state. We can handle our event manually (e.g. apply custom action instead). That’s also helpful when it comes to submitting the form. In most of the popular libraries, we don’t actually want form element to send HTML from. We want to handle form data manually, apply validation, parsing and add some extra data before sending.
Dispatching events manually
I’ve said before, event doesn’t have to be created by the browser, we can create them. To do that we have to create new CustomEvent instance, and dispatchEvent. CustomEvent is basically the same standard Event but has an additional attribute in options object called details. That attribute is used to store custom data.
const clickedData = document.getElementById('clickedData');
const dataEvent = new CustomEvent('addData', {
  detail: { test: 'test2' },
});

clickedData.dispatchEvent(dataEvent);
Let’s add listeners to our tree to listen for our custom event

What will happen when our code is executed?
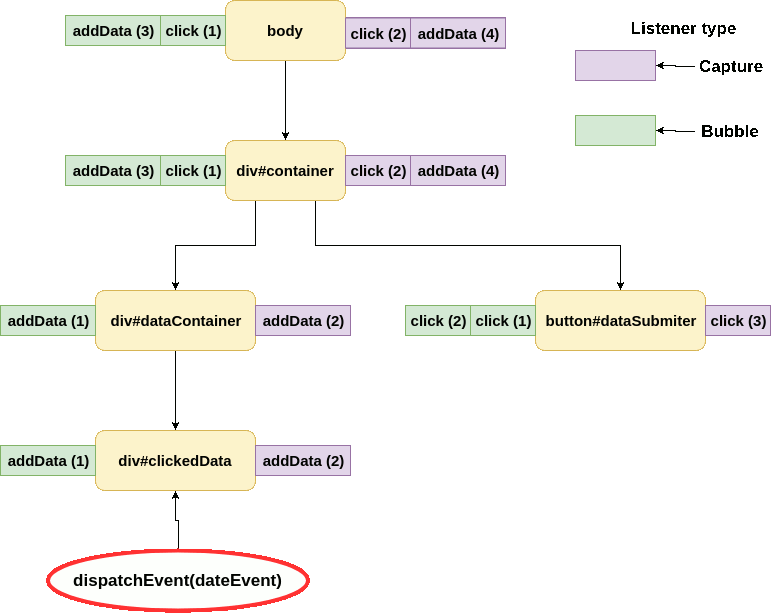
Wait for the second, why there is no bubbling?! In our case event stays on On Target phase. Reason for that is because by default all events created using new CustomEvent() have bubbles set to false.
To enable bubbling for this event we have to create it with options object:
new CustomEvent('addData', {
  bubbles: true,
  detail: { test: 'test2' },
});
Using
CustomEventis not mandatory. If you want you can create instance ofnew Event()and use it for your propagation.
When we might want to use custom events?
I think sending data to elements it’s obvious. A good example to show you why you might want to hook up into event propagation is React’s HOCs (Higher Order Components). Imagine an application with multiple layers of logic wrapped around your form. It might look sth like:
<div id="app">
  <div id="addUserData">
    <div id="prefillAfterReset">
      <form>
        {...}
      </form>
    </div>
  </div>
</div>
In this case, we can hook into form’s submit and reset events even before they reach our form component and add/modify data on submitting/resetting the form. I’m not saying to implement such behavior because there are better ways to do it.
If you want to play with events please check this sandbox